Cinematics
This guide assumes that you have already installed the Basic Extension.
Also, make sure you have read the layout documentation and created a cinematic page.
In this tutorial, you will learn how to create and view cinematics in your interactions!
What are cinematics?
Cinematics are timed sequences of actions that can be played in your interactions. They are used to create cutscenes or other timed events.
Creating a cinematic
Let's get started by creating a simple camera cinematic.
Adding a camera cinematic
Firstly click on the + icon in the top right corner of the panel and search for Add Camera Cinematic. Add it to your page by clicking on the + icon.
Creating a segment
Now we need to add a segment to our track. You can do this by clicking on the New Camera Cinematic entry in your page and by operations clicking on Add Segment(1).
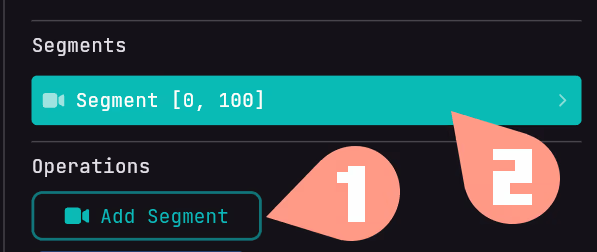
After you create the segment, you can click on it (2). This opens the inspector of the segment.
Modifying the camera segment
In a camera cinematic segment, you have a path. Each path contains a list of locations in a world of your server. When multiple locations are specified on a path, the player will move between them. If only one is specified, the player will stay stationary.
To create a path, click on the + icon in the inspector at path(0).
To set a location in a path, you have 2 options: using the content mode or configuring it yourself.
Using the content mode
The content mode allows you to get the player's current location and fill in the fields for you.
Configuring it yourself
You can also configure the paths yourself. This can be done by opening the Path #1 field. In there, you can configure the location of the path. These are:
- World: The world where the cinematic happens.
- X: The x coordinate of the location.
- Y: The y coordinate of the location.
- Z: The z coordinate of the location.
- Pitch: The pitch of the camera.
- Yaw: The yaw of the camera.
Duration: The duration of the location to the next location in ticks. Understanding how this works is crucial for creating smooth cinematics.
Understanding Duration
The duration for a path point is the amount of frames (ticks) it will take from that point to the next point.
Key principles:
- Last point's duration is ignored
-> there's no "next" point to move to - Sum of durations must equal segment duration
-> all movement time must add up - Unspecified durations are auto-calculated
-> remaining time is split evenly
Example: 4 Points, 100 Frame Segment
Setup:
- Point 1: Duration unspecified
- Point 2: Duration 50 frames
- Point 3: Duration unspecified
- Point 4: Duration 10 frames
(ignored - it's the last point)
Result:
- Point 1 → Point 2: 25 frames
(auto-calculated) - Point 2 → Point 3: 50 frames
(as specified) - Point 3 → Point 4: 25 frames
(auto-calculated)
Auto-calculated durations:
(100 - 50) ÷ 2 = 25 frames each
With only 2 points, specifying duration is unnecessary since it must equal the total segment duration. Leave it unspecified for automatic calculation!
Repeat this process to make more locations in the path.
result
For the result we are going to use the example for the duration. You can easily view your cinematic by running the command:
/tw cinematic start (page name) or adding an Add cinematic to a sequence page.