Option Bound
This guide is made for advanced users. It is recommended to have a good understanding of how Interactions and Interaction Bounds work.
The story of this guide will be a waiter that is asking at wich table the player would like to sit.
In this guide, you will learn how to create an option that has a interaction bound applied to it. This means that while scrolling thrue the options the players bound location can change.
Creating the option
For this guide we will be connecting the option to an On Entity Interact Event from the Entity Extension.
Creating the Option Dialogue
First, we'll create an option dialogue that will be shown when the player interacts with our waiter NPC:
- Right-click on your
On Entity Interact Evententry and select+ Link with ... - Search for
Optionand add it to your sequence
Configuring the option
Now that we have added the option, we need to configure it. Select the Option entry and open the inspector.
Configure the dialogue text to be: Welcome, at which table would you like to sit? and the options:
- Spruce Table
- Birch Table
- Dark Oak Table
- Go Back
Learn how to configure the options in the Options Guide.
Adding the Interaction Bound
To add an interaction bound, right-click on the On Entity Interact Event entry and select Link with ..., search for Lock Interaction Bound and add it to your sequence.
Configuring the Interaction Bound
Select the Lock Interaction Bound entry and open the inspector.
Adding a Case Variable
Enable the Target Position setting in the inspector and click on the icon, search for Add Case Variable and add it to a facts page.
Configuring the Case Variable
Select the Case Variable entry and open the inspector.
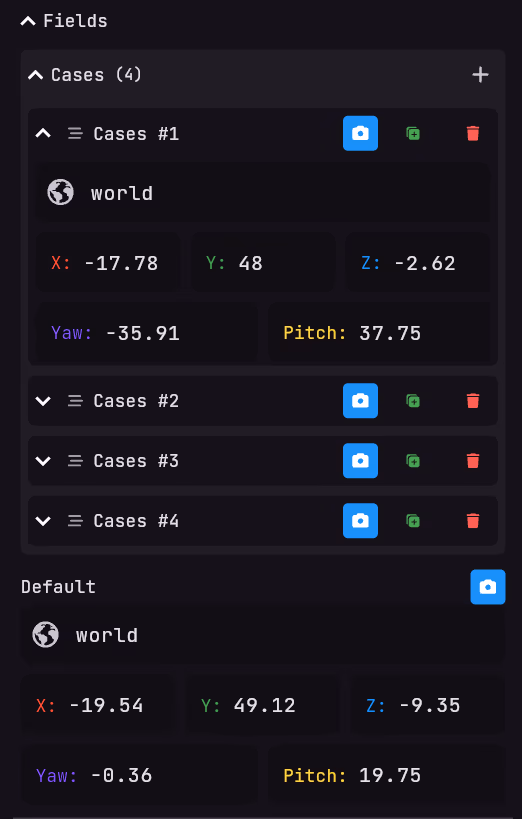
The case variable stores different locations based on a supplied number:
- This system is 1-based (not 0-based)
- Case 0 = default location (used when no matching case is found)
- If no case matches, the default location is used
For our restaurant scenario:
- Set a default location using the icon (shown when no case matches)
- Click the
+icon in the cases field to add our four viewing positions:- Case 1: Spruce Table location
- Case 2: Birch Table location
- Case 3: Dark Oak Table location
- Case 4: Go Back location (original position)
- Capture each position using the icon
- Your
Case Variableshould look like this:
Adding a Interaction Context Variable
Now when the player scrolls thrue the options nothing happens yet. To do this we need to add a Interaction Context Variable to the Case Variable inside the Lock Interaction Bound entry.
To do this, click on the icon at the Selection field inside the Case Variable entry and search for Interaction Context Variable.
Configuring the Context Variable
This variable automatically provides the currently selected option index:
- Select the
Interaction Context Variableentry - In the inspector, click on
Select a Entry - Choose the
Optionentry we created earlier - Your
Interaction Context Variableshould look like this:
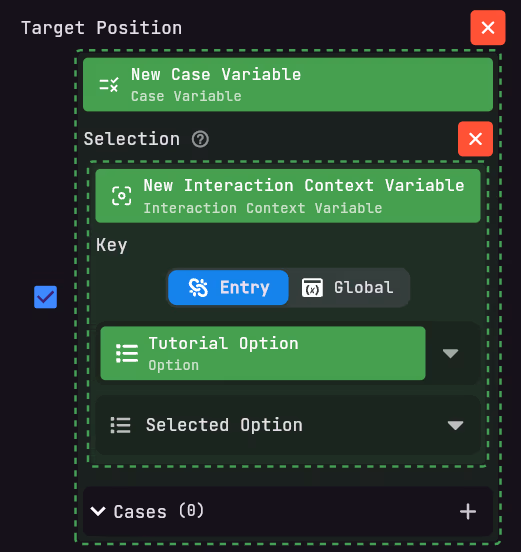
The image shows Cases (0) because I configured the cases globally in the facts page rather than locally in this specific entry.
You can configure variables via 2 ways:
- globally (in the facts page for reuse across multiple entries)
- locally (within a specific entry).
The functionality works the same either way - the system will use the appropriate position based on the selected option index.
Result
Now your pages should look like this:
- Sequence Page
- Static Page


When players interact with the waiter NPC, they'll see the option menu. As they scroll through the different table options, their view will automatically shift to look at each table, creating an immersive way to make a choice.
While writing these docs a bug was found with the confirmation key. If your confirmation key is SWAP_HANDS(F) than while inside a interaction bound the dialogue will not continue. You need to press SPACE to do this!
How it Works
The Option Bound system works through these key components:
- Lock Interaction Bound - Controls the player's position and view
- Case Variable - Stores different positions for each option
- Interaction Context Variable - Provides the current option index
- Option Entry - Provides the dialogue interface
When the player scrolls through options, the Interaction Context Variable updates with the new option index, which selects the corresponding position from the Case Variable, and the Lock Interaction Bound applies this position to the player.
This creates a seamless experience where the player's view changes based on which option they're currently hovering over, allowing them to "look at" their choices in the game world.