Entities & NPC's
You must have installed the Entity-Adapter before starting this tutorial.
Any good storytelling requires other characters to be present in the world. Typewriter has its own entity adapter that allows you to create and control entities like NPCs.
What is the Entity Adapter?
The Entity Adapter is a feature that makes it easy to spawn, manage and control entities like NPCs on your server.
These are some of the features:
- Defining an entity: create a new entity with custom data and spawn it in the world, which can be re-used across multiple servers
- Conditional showing of entities: have an NPC appear only when the player is in a certain quest stage
- Activities: add custom actions to an entity, like walking to a tavern at night or patrolling the city
Creating an NPC
Entities in typewriter have to be defined an a Manifest page.
This is done by creating a new definition of the type of entity you want to use.
This definition can be spawned many times using an entity instance.
An NPC is a special type of entity that is a player and has a nametag and indicator above their head. This makes it easy to use and is likely to be the most common type of entity you will use.
Creating a new NPC definition
To create an NPC definition, you have to create a manifest page and define the NPC inside it. Here is an example of how to define an NPC:
Start off by clicking add page.
Here, choose the Manifest type in the dropdown menu and name the page whatever you want.
In this example, we will name it Characters.
If you need more information on how to create a page, see the Layout section.
Next, you have to define the NPC. Click the Add Entry button or the + in the top right corner,
then search for Add NPC Definition, and add it to the page. You should now see the entry on your screen.
Customizing the entity
Now that you have defined the entity, you can customize it to your liking.
Setting the entity's name
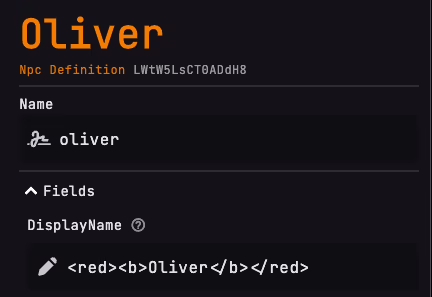
Let's rename the entry to Oliver Definition.
To change the display name above the head, we can change the Display Name field to <red><b>Oliver</b></red>.

Setting the NPC's skin
To change the skin of the NPC, we can change the Skin field.
These take in a texture and a signature.
These need to be generated by Minecraft and are not easily editable.
Luckily, Typewriter provides a way to generate these for you from a player uuid or an url.
Let's change olivers skin to this one I found on NameMC
We can click on the chain icon to the right of the Skin field to Fetch from url.
Then, we can enter the url https://s.namemc.com/i/b2319359e305d7a2.png and click Fetch.
Creating an npc instance
We have now defined the NPC, but it has not yet spawned in the world.
To spawn the entity, we have to add an Entity Instance entry.
Each type of entity has a different Entity Instance definition.
For NPCs, we can use the NPC Instance definition.
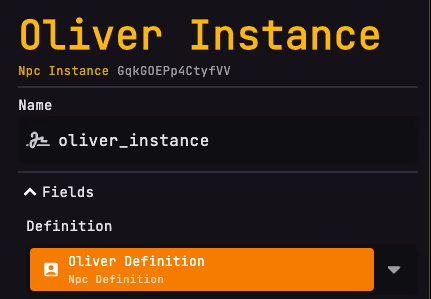
First, select the NPC definition you want to spawn from the Definition dropdown.
In this case, we will select the Oliver Definition we just created.
This will act as a base for our NPC instance

Finally, we need to set the spawn location of the NPC. This is the location where the NPC will always spawn when the first player may view the NPC.
We can do this with the content mode selector and fetch the location of your logged-in Minecraft client.
That's it! You have now created an entity definition and spawned an instance of it in the world. You can now see the NPC in-game with the custom name, skin and data you provided!
The same principle applies to all other entities, such as Cows or Villagers. You can define and spawn any entity you want using the Entity Adapter; just make sure the type of your definition matches the type of instance you want to spawn.
Since not all entities have a definition or instance, when you need to create an entity with a type that has no definition or instance, request it from the Discord.