First Cinematic
This guide will lead you through making your first cinematic.
This guide uses the Basic Adapter, hence it must be installed before following this guide.
This guide builds upon the First Interaction guide. We strongly recommend reading through it before following this guide.
What are Cinematics?
Cinematics are a way to have different actions happen in a precise order over time. This includes having the player's camera move around from location to location, having particles show up at different locations at different times, having NPCs move around, and much more!
This makes cinematics useful in a wide variety of scenarios, with some examples being:
- A cutscene in a quest
- As part of a tutorial
- Fast travel
- Random encounters
- And a lot more
Creating a Cinematic
We'll start off by making a simple cinematic with a cinematic camera entry, with the cinematic being triggered through a command. Later in the guide we'll continue the First Interaction guide to trigger the cinematic from a flower.
Creating the Page
Start off by clicking add page. Here, choose the Cinematic type in the dropdown menu, and name the page flower_cinematic.
Adding a Camera Entry
Let's now add an entry to the newly created page. Click the Add Entry button or the + in the top right corner,
then search for add: camera, and add the Add Camera Cinematic entry. You should now see the entry on your screen.
Let's rename the entry to camera_view. Then, click Add Segment to add a new segment to the entry.
You'll now see a lot of new fields that aren't in the other pages. Let's go through those.
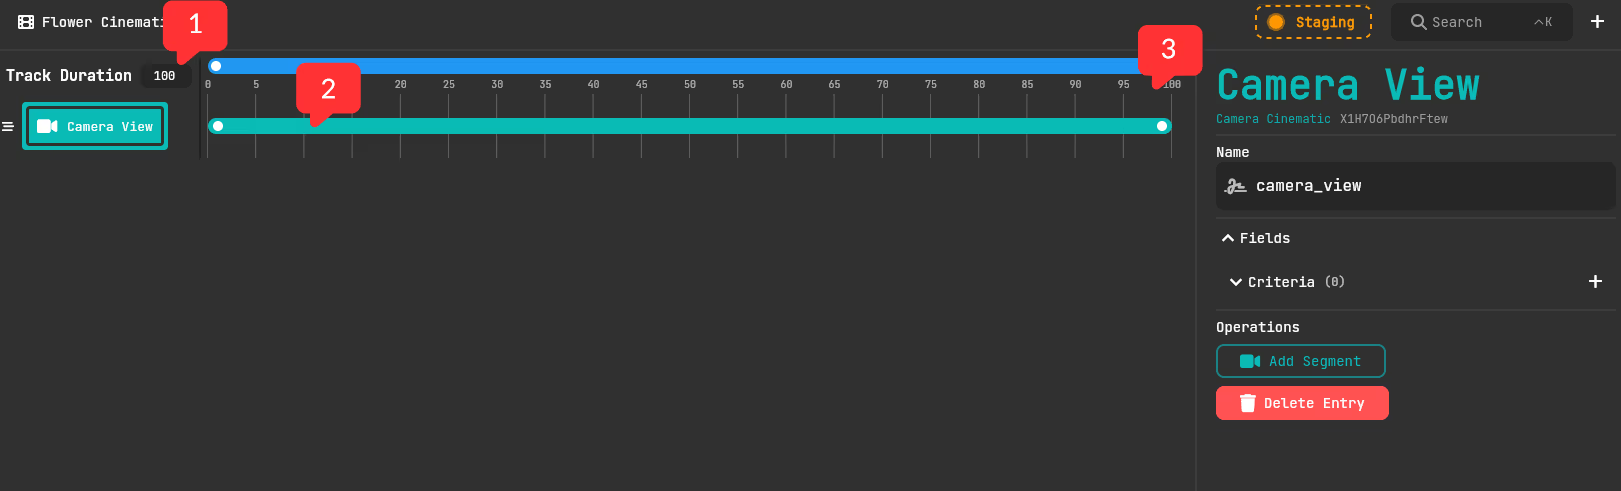
Track Duration (1)
The track duration field is where you decide the duration of the entire cinematic. It's important to note that the duration is in amount of frames, and not in seconds. You can however easily convert from seconds to frames, as 20 frames is equal to 1 second.
Segments (2)
A segment is what the entry does in that specific time frame. Entries can have multiple segments, but an entry can't have overlapping segments. For that, create another entry.
Segments Track (3)
This is where the segments of entries are displayed to you. Here you can change when a segment starts and when it ends.
Keep in mind you can also do this on each segment's sidebar by modifying the Start Frame & End Frame fields.
Now that that's explained, we need to add a segment to the camera_view entry.
Make sure you have the camera view entry selected, and then click Add Segment on the entry sidebar.
This creates a new segment that spans the entire track.
We now want to make this segment do something, and to do that, we need to add paths.
For the camera entry, this will be the locations it moves the player's POV between.
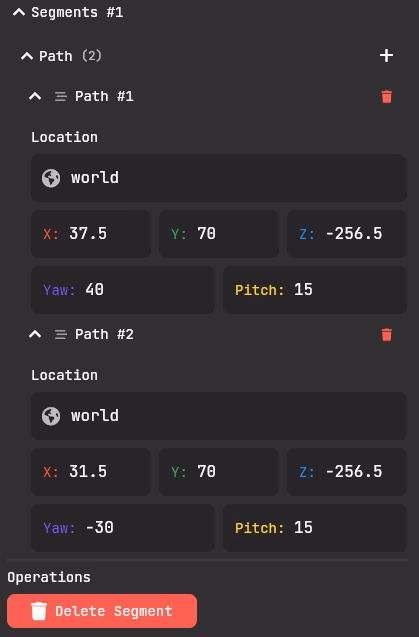
Let's start with making two paths. To do that, click the + symbol next to Path on the sidebar twice.
Expanding Path #1, you'll see a new area called Location with several fields to specify the location of this path.
We now need to decide on two locations. To more easily continue the guide later on, I recommend picking two locations
around a red tulip. We then fill in Path #1's location, and expand Path #2 and add the location of that path.
Remember to add two different locations. You can see example paths in the screenshot below.
You should now have a functioning cinematic!
Let's Publish and check it out. Type /tw cinematic start flower_cinematic in chat, and
the cinematic should start playing!
As you see in the beginning of the camera path, the camera weirdly turns around.
This is because when starting the cinematic, Minecraft needs a few frames to set everything up.
To make it not noticeable, we can start the cinematic a few frames later.
The recommended amount is 20 frames, which is 1 second. To do this, we can either change the Start Frame field
on the segment, or drag the segment on the track to our desired starting point.
To make it really feel cinematic, you can add a black screen at the beginning of the cinematic.
Using the Blinding Cinematic entry, you can make the screen
go black for the first 20 frames.
Currently we only have one segment, which means the cinematic will end after the segment is done. We can add more segments to create different camera paths.
Try adding a new segment, and then adding mutliple paths to that segment. If you have done everything correctly, you should now have a cinematic that looks something like this:
Triggering the Cinematic
I strongly recommend picking a specific red tulip and changing the cinematic paths to be around it if you havn't done so already.
Now, you probably want the cinematic to be triggered when a player does something, and not through a command. Let's do that by modifying the flower example from First Interaction so that one of the options causes the cinematic to play.
Let's head over to the Flower page by clicking on it in the Pages sidebar. We then simply want to add a new entry.
Search for add: cinematic when adding a new entry, and select Add Cinematic entry. We'll then rename this entry to
play_flower_cinematic, and in the entry sidebar, click on the Page field. Here you should see the Flower Cinematic page
that we made earlier. Select that page, and then select the Inspect Flower entry. Here we want to add a new option.
Let's call it Look at flower. In the new option, add a new Trigger, and select Play Flower Cinematic option in the search box.
Strongly recommended to pick a specific red tulip and changing the cinematic paths to be around it.
You should now be able to select the option Smell the flower when clicking a red tulip, and it'll play the cinematic.
Adding dialogue
Let's make the cinematic have dialogue when it's playing. To do this, head back to the Flower Cinematic page.
Here, add a new entry and search for add: actionbar, and select the Add Actionbar Dialogue Cinematic entry.
We'll then rename this entry to flower_dialogue. Now, let's first add a speaker to the entry. Let's use the Flower Speaker.
After that, click Add Segment to add a segment to the dialogue entry, and select it.
Let's change the time frame of the dialogue to start after 1 second. To do this, we can either change the Start Frame field, or drag the segment on the track to our desired starting point. We also have to remember that duration is in frames, not seconds, and remembering from earlier, 1 second equals 20 frames, change the Start Frame to 20.
We then have to add the text to be displayed. Insert That flower looks <red><bold>stunning to the Text field.
And we're done! Dialogue should now appear 1 second into the cinematic. There are a few different dialogue entries as well. Here's a quick overview:
Actionbar Dialogue Cinematic
Will send the speaker & the message in the actionbar.
Subtitle Dialogue Cinematic
Will send the speaker in the actionbar, and sends the message as a subtitle (middle of screen).
Spoken Dialogue Cinematic
Will send the speaker & message in chat.
Adding Particles
You can also add particles to be displayed during the cinematic. Let's do so hearts appear around the red tulip.
To do this, add a new entry and search add: particle, and add the Add Particle Cinematic entry, and rename it to
flower_particle
For this entry, we modify the particle effect on the entry itself and not on the segments.
Let's start by selecting the particle type. Click the Particle field in the entry sidebar, and scroll down until
you find the HEART particle and then select it. Then, enter the location of your Red Tulip in the location field above.
We will then define the particle offsets, speed & spawnCountPerTick. Think of the offset fields as a box around the location
you've specified, and particles can spawn anywhere inside the box.
We will set offsetX and offsetZ to 1, and leave offsetY at 0.5. We'll then set the speed to 0.1 as to not get a lot of
hearts spawning at the same time, and we will set spawnCountPerTick to 1, meaning that 1 heart will spawn every tick.
Now, we will add a segment to the particle entry, and we're finished! If you now play your cinematic, heart particles should spawn around the red tulip.
Adding a Self NPC
For this step, you have to type /tw connect from in game as a player, otherwise you won't be able to record the NPC movement.
Want players to be able to see "themselves" while in a cinematic? Well, you can! Let's add a self NPC that walks over and looks at the flower
during the cinematic. To do this, add a new entry and search add: self npc, add the Add Self Npc Cinematic entry, and rename it
to player_walk. We then want to click Add RecordedSegmeent, and select the new segment that has been made. Now, you'll first need
to create an artifact by clicking the Artifact field. There, select Add Npc Movement Artifact, and select Flower Static as the static page
to store the artifact in. Then, rename the artifact to player_look_at_flower.
We then first want to Publish, before heading back to the cinematic page, select the player walk segment again,
and now we want to click on the camera button to the right of Artifact, and open our Minecraft. Here you'll see a bossbar telling you
to press F to start recording. Pressing F will cause the cinematic to start playing without the Camera Entry, and all your movements during the
cinematic will be saved and be used for the NPC movement. You'll want to move to where you want to start the NPC movement, and hit F, before
following the cinematic to add movement to it.
If you now play the cinematic again, an NPC with the skin of the player watching the cinematic should appear, with all the movement you did.
Next steps
You should now know how to make simple cinematics, but remember, cinematics have a lot more to offer! Try messing about with the other options like NPCs that walk around, playing sounds, blinding cinematic & more!